Thursday 28 June 2012

Not Pretty Just Practical

Ever felt the need to get organised?, I do at the moment. I cannot organise the house because we have builders, plumbers, plasterers and wood burner installers in and out of the house.
They are doing a great job but I want to get stuck in and paint, get sorted you know the feeling, when will it end.

So I am reduced to organising my blending foams and I will have to be happy with that for now.

I have my spinner rack for the foams, but I wanted more so that they did not all end up brown,
careless I know, but it so easy to pick up the wrong one.

A handy Route 52 clipboard came to the rescue......


 With low tack masking tape I sectioned areas off to make a grid, then coloured with Distress Inks.


You can download the colour names from ranger, Jamie did the new names for me. ( if anybody wants the file let us know and he will send them to you).

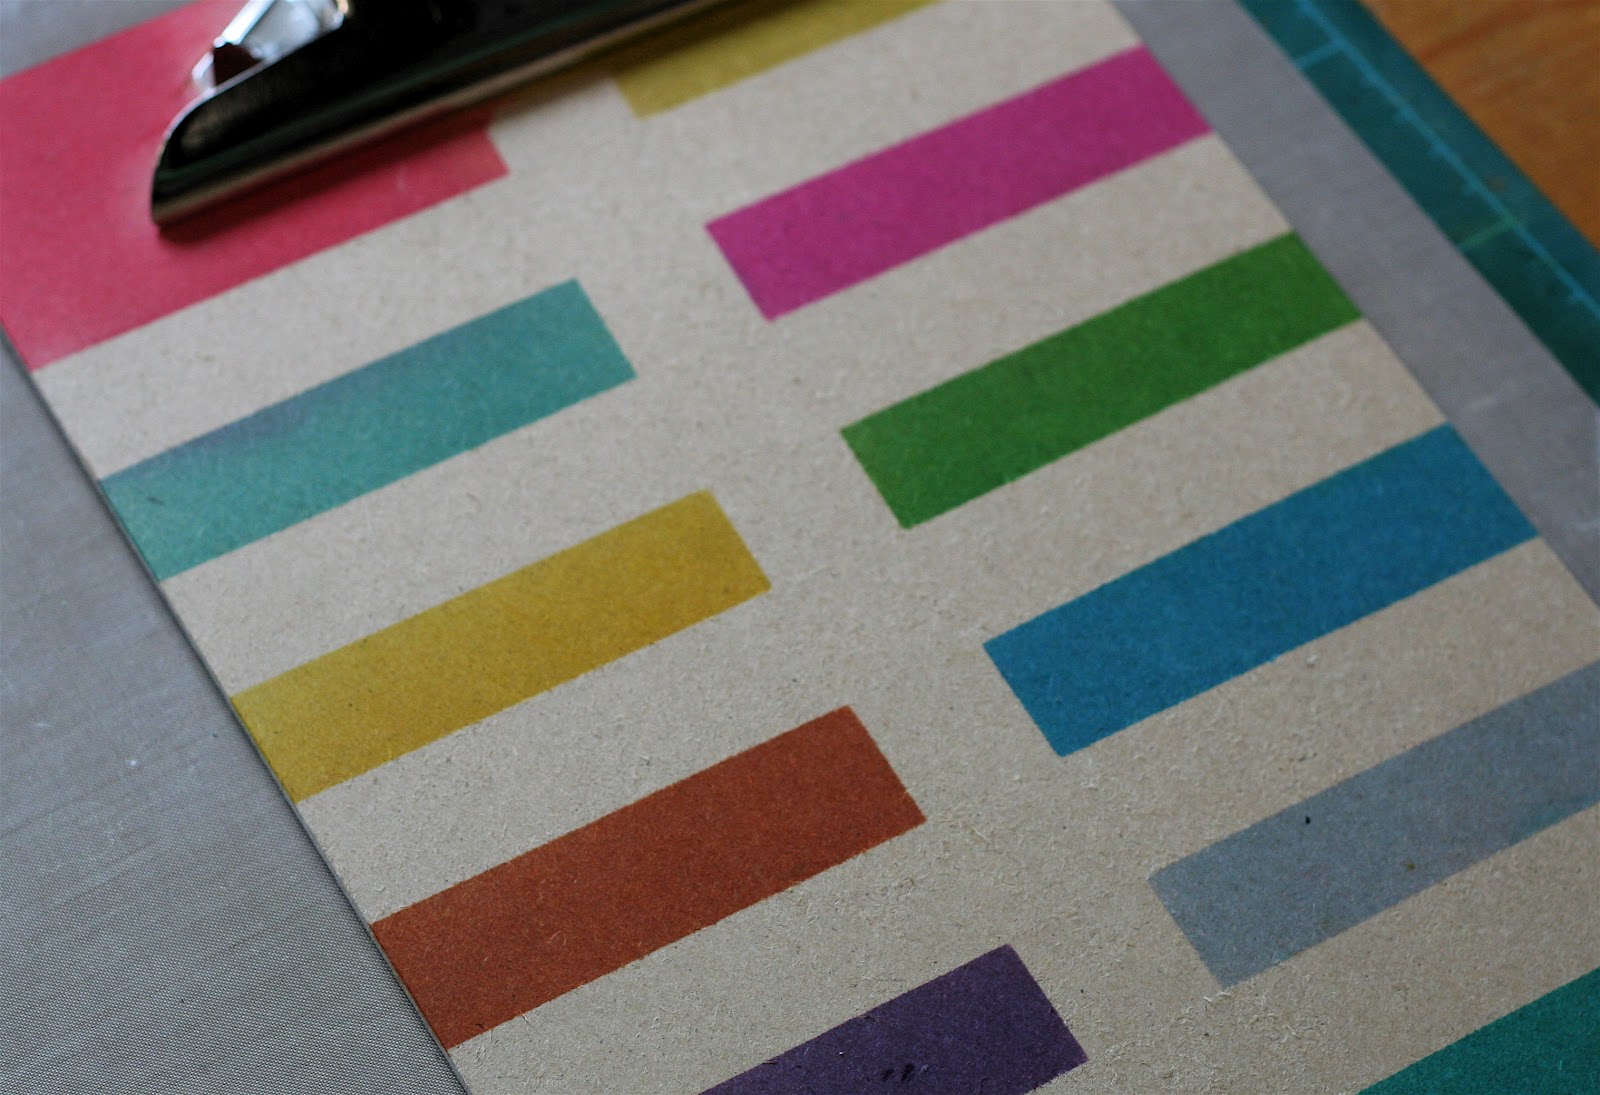
I coloured the names with the corresponding colour and stuck them down with double sided tape.

I then cut pieces of velcro, the hoop side, it was not quite sticky enough to withstand being pulled about when I removed the foam pads, so I applied a small amount of Matte Medium and that stuck it firmly.


I also put the coloured names onto the front of my new Distress Inks. You may think I have too much time on my hands?
 

The board was too plain down the centre it needed a little something.
I coloured 3 pieces of card with different Distress Inks, by applying it to the craft sheet and misting them swiping the card though it.I then cut out the letters using the Vintage Market Decorative Strip Die  I needed to do it 3 times because of the amount of S's in Distress.
Them glued them to a Sizzix Tattered Banner by Tim Holtz and a few flowers from the Tattered Flower Garland.


It's not pretty but it's practical, only problem is I will need a few more boards, but at least I haven't got a jumble of foams on my desk.
We have just worked it out and I will need one more as there are 48 Distress Inks including the seasonal ones.

Hope you are all having a good week, and lets hope we get summer soon lol.

Bye for now

Sharon

Wednesday 20 June 2012

Spring or Summer

I absolutely love the new Spring & Summer Distress Inks the colours are so vibrant.

When I saw the colours I thought I had enough greens but they are so different, it made me so glad that I took the plunge and bought them.

To colour the tags, firstly I applied distress inks to the craft mat and spritzed with water, then swiped the tag through the inks, then dried it with the heat tool.
If you need anymore colour go back into your inks or add more colour with a blending tool. I did this with the Squeezed Lemon as it needed more on the manilla tag.

Then it's stencil time... just blend the distress inks over the stencil keeping a firm hold onto it.
I used Dylusions Luscious Leaves 5 x 8 on the Discover your passion Tag.

The large butterfly, dandelion fairies and the meadow are from Indigo Blu's Wild meadow stamp.
The small butterfly and the wording are from Indigo Blu's 'Discover your Passion' stamp.

They have all been stamped with black archival, I also waited to make sure the stamp was dry before stamping as I found you get a clearer image.


Next Dylusion's Ruby Rainbow stamp and Dotted flowers stencil.
I thought Ruby would approve of the colour's.


I also wanted to try Sewing room from Paper Artsy's HP1215 Stamp, I have been using the stamps with Paper Artsy paints so there is a great difference ( I will show you next time I post).
The scissors have been stamped onto metal foil and cut out and applied with collage glue. If you have never tried a Collage Glue stick I can recommend them, they dry completely not like some other glue sticks which remain sticky if you get it onto the front of something.


Finally Juliette from Indigo Blu.
I decided to emboss this in white rather than black as I usually do.  I like the contrast.


That's it for now, must go and get inky. I must say the new pads are really juicy or maybe I need to reink some of my old ones.

Thanks for looking in and I do appreciate your comments.

Sharon x


Friday 15 June 2012

Discovery

Just a quick post to show a couple of cards I have made with Fathers Day in mind.

I purchased some new stamps, tissue paper and Paper Artsy paints the other day, then embarked on a crafting frenzy, there was projects everywhere but none finished. Now I have completed the cards I shall go back and tackle the rest.

I used Crafty Individuals Stamp CI 295 Discovery and painted it using Distress Inks Scattered Straw and Peeled Paint using the Tim Holtz Water Brush to highlight the ship and border.

It is mapped on Tim Holtz Lost & Found paper stack. There are some handy pages which can be divided into 6 x 6 just right for cards. A length of bakers twine just to finish it off.


I wanted to keep it simple for posting.

The second one is very similar but mapped on some older paper I found. That is the joy of keep moving your craft room from one place, you "Discover" things that you saved because they are too nice to use straight away.


I hope you have a great crafty weekend, I'm going to see if my paint has dried.

Please leave a comment, no matter how small. It's nice to know I am not alone out here.

Thank you
Sharon

Monday 11 June 2012

Artsy Crafts

Yesterday I had a fantastic day at Artsy Crafts, met some wonderful people.

We got really messy, we painted, glued, baked, wired, mica'd, nipped, rusted, dry brushed, transferred, gold leafed and if that wasn't enough we had a super roast lunch, cheesecake, chocolate fountain, danish pastries and still managed to work in the afternoon.

Here are a few of the Photo's


Leandra and Lin at the beginning of the session, showing us what we are about to create. Oh my life !!


Wooden pieces spritzed with water and sprinkled with rusting powder, they all turn out different.


Close up of the original Rusty Relic. There is a lot going on under the wire which the camera has not picked up.


Leandra and Lin receiving some lovely pressy's from the very generous ladies from up north. Sorry ladies I don't know your names.


Here is Tracey's masterpiece being stapled By Leandra. There was some very different colours from the  
Paper Artsy Paint range being used, they all looked great.


Tracy watching as the final finishing touch is being added by Leandra with her kachunging machine?


Mine having the kachunging magic applied. (it's really a staple gun)


Mr & Mrs Hot Picks. Mark was also the chief clay baker, plus a host of other duties that helps to make the weekend run smoothly.


It was really great to meet up with Rachel & Janet again. They must have a lot of stamina I was exhausted after 1 day they both did 3 days.


I made that.......


I learnt so many new techniques was reminded about some that I had forgotten. Best of all met some wonderful people that are so passionate about crafting.


Thank you Leandra, Mark and Lin for a splendid day. 

Friday 8 June 2012

Haberdashery

Haberdashery is the in thing, there are some great stamps available old and new.

I've used one of my old favourites Darkroom Doors "Fashionable". I have also used the Tim Holtz Bigz Die Sewing room. The first card is mounted onto Canvas Cloth, I have used the reverse side which gives a more natural look.

Maybe when I get the New Paper Artsy stamps or the New Crafty Individuals they will be my favourites.


(Would you believe it the delivery van has just been and delivered the New Paper Artsy stamps, the most difficult decision of the day Which One to have).

On Sunday I am going to Artsy Crafts to spend the day with Leandra and Lin doing rusty relicky thingies. The mind boggles but it's bound to be messy, more techniques to learn. If your going too, say hello it will be great to meet you. I already know a couple of lovely ladies that are going, I will be wearing a black Artist Trading Post apron.

Below is a card I made using the Lynne Perrella stamp LP008. After stamping the card with Archival Jet Black I coloured it in using Distress Ink swirled onto my craft sheet.
The new Tim Holtz water brush is brilliant for this. You don't have to keep changing brushes or washing it out, and you can blend the colours make them lighter and darker. It also has a valve so you get a nice constant flow, not like a different brand I have and it floods the page.

While the melt pot was out I made an embellishment by pouring melted Utee into a cookie cutter which is placed onto the stamp. Always check with the manufacturers 1st to ensure that the stamps will stand up to the heat, some need to be stamped with perfect medium to ensure the utee comes clean away.


Thankyou for stopping by and I hope you have a good weekend and don't get too wet.

Sharon x