Wednesday 31 October 2012

Kaisercraft Shadowbox Draws

Hello everybody, I hope you had a good weekend and made the most of a sunny Saturday and then relaxed on the wet Sunday. There's me assuming everybody has the same weather as us in Mid Wales.

We had a splendid weekend starting with June, David, Josh and Sam arriving from Ashbourne, and with two sorts of delicious cake, Thank you again for taking a detour to come to see us and of course Jack & Bru where really pleased to see other humans and Nell and Neb their collies.

After that it was back to work and it was such hard work lol....

I just loved the Kaisercraft Shadow Box Drawers when they arrived into stock, and knew that I just had to make one :)

I choose to use Graphic 45 papers the Christmas Emporium range, I only needed to use 3 sheets of paper which were, Happy Holidays, Christmas Emporium and Special Delivery. They are a super weight and don't buckle under the glue.


It's a good idea to assemble the box before gluing. I did use wood glue in the end but you can use which ever is your favourite.


Next I glued all the little boxes with glossy accents. It does need a few minutes to grab so here's a photo of me multi tasking. Holding one closed while gluing the next (and listening to a audio book).


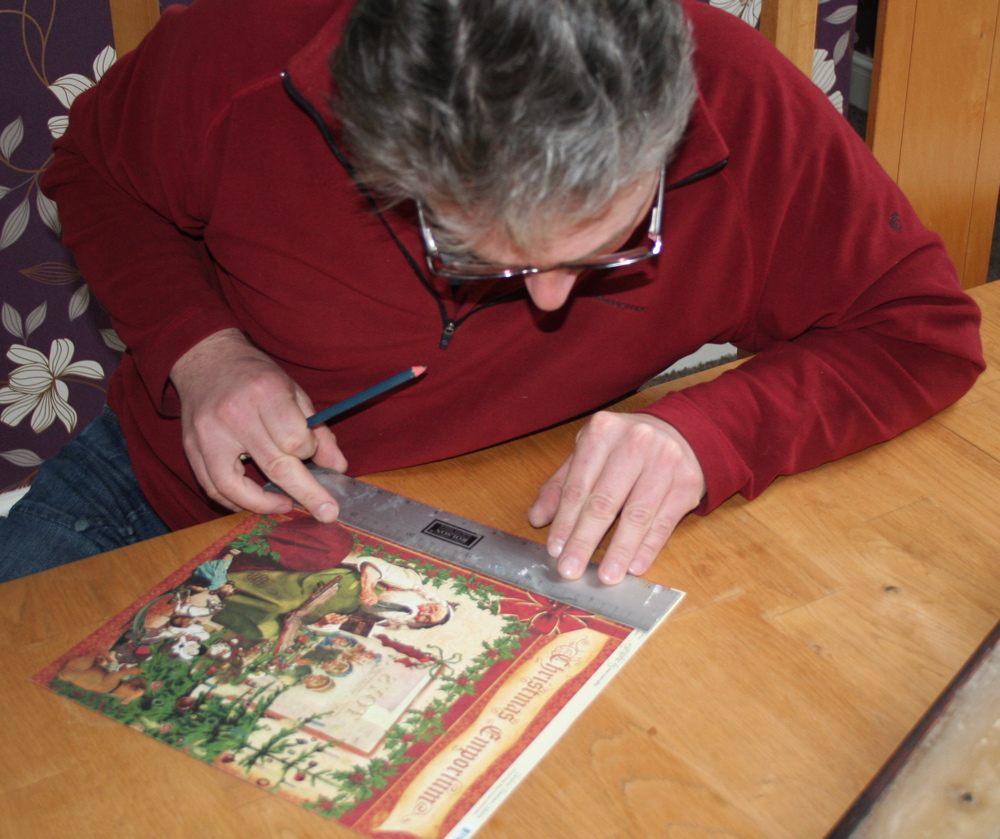
I made a template out of plastic packaging for the shape of the drawer fronts, so I could see what the picture was like before I  traced it and cut it out.


Here are the drawer fronts before gluing to see if I was happy with the one's I had chosen?


Here's Jamie doing his bit.


I inked all the edges with Tim Holtz Distress Ink Vintage photo this seems to bring everything together at the end.


Enough sitting down, time to stand up, oh what a surprise a football waiting for me, thank you Bru.


It was difficult to decide on the colour to paint the main box, because I wanted the same tone as the paper, so after three brown's the top coat is Claudine Hellmuth's Sable Brown.


Side pieces distressed with Walnut Stain Ink.


And here it is all assembled.


It will properly be filled with chocolates and I'm not sure whether to number the boxes 1 to 25 or if it will be pot luck if you get a chocolate or not.
I just had another thought you could decorate the back of the little individual boxes and have a spare centre picture and change the whole look of it so you could use it all year round. Remember a Shadow box isn't just for Christmas. 


Sorry but I thought it was too early to decorate the Christmas trees. They are gorgeous from Tim Holtz's Idea-olgy range, if you want some don't leave it too long because they are flying out.


You can also get the little buckets and terracotta plant pots from us check out Route 52.

Thank you for looking in and I hope this inspires you to have a go, This Shadow box with be one of these items that gets unpacked year after year. It could even become a family heirloom!

Sharon


Thursday 25 October 2012

I don't know where the week has gone, I always have good intentions of starting my next blog after I have finished one. But before you know it a week has passed by.

Well I have had some fun playing or should I say creating, and I have actually finished 2 out of the 3 projects I was working on.

Firstly my journal page I completed after watching Kate Cranes DVD Right from a blank page and There are no mistakes in art. I loved the way it gets you to work on layers, adding extra colour, introducing different shapes and splats without covering everything in sight. I cannot wait to see her new set of DVD's Bold Backgrounds and Personalised pages.


Then there's the book cover I had been working on, this is the project thats not completed yet.


The next was inspired by the colours of autumn, Jamie and I went for a walk up the hill from our house. The sun was setting it was just beautiful.


Here I've been working on layers, using ribbon, grunge board, Sizzix dies, Route 52 embellishments and the New Eco paints and Ranger gold dabber.

I found it better to have more than one project on the go because they took a while for the glue and paint to dry.

So i've tidied up the craft room ready for the next experiment, which is going to be for Christmas.
But there's another table appeared in there, I think Jamie's going to have a dabble. Watch out Tim!

Oh and another thing, do you think I should tell our neighbour he's got a loose slate?


Thanks again for stopping by, better start getting ready for friends coming from Ashbourne tomorrow, June & David (June makes the most wonderful cakes).

Keep crafting

Sharon


Saturday 6 October 2012

International (card making) day

Just made a couple of card's for International Card Making Day.

Leandra over at Paper Artsy has set a competition and I thought it might be nice to show her how my image transfers have turned out after watching her brilliant tutorial on her blog.

I already have a lot of their paints and stamps, so the only item I needed to get was the Satin Glaze for the image transfer.

It works great and every time, no more sitting and wondering if it's going to turn out ok.

The backgrounds have been painted with Mushroom - Rose and Vintage lace, I also smeared a small amount of paint onto a script stamp to build up the background.


The flower stamp MN71 was stamped onto crackly tissue paper, when the archival ink was dried I painted the flowers from the back, then stuck it  onto the card with matt medium, being careful not to rip the tissue.

Sorry for the short post but the sun is shining and the boys are wanting their walk.

See you soon and thank you for looking in.

Sharon